
Most fine-tuning guides are about image models. Video is harder, and video with sound is harder still. Clips have lengths, speech can get cut in half, and memory runs out much faster than you'd expect.
This post covers how we trained a style adapter for MiniMax H3, an open text-to-video model that generates audio too. The style was the look and sound of The LEGO Batman Movie. We'll cover the data, the training, the costs, and above all the bottlenecks.
The model: MiniMax H3
H3 is an open video model from MiniMax. It takes text, images, video and audio as input, and it generates video with native stereo sound: up to 15 seconds, at up to 2K.
fal's MiniMax H3 prompting guide has many example prompts and videos.
The problem: H3 knows the character, not the look
Base H3 is a strong general model. Browse the examples in fal's prompting guide and you'll see what it can do out of the box. But ask it for a specific look, and you get its average idea of that look.
Here are two examples. Each pair uses the same prompt and the same seed. The only difference is the fine-tuning.
Example 1: The Joker
lego batman style, The Joker with green hair and a purple suit laughs in a green-lit Gotham square at night. He says, "Hello, Batman." The camera pushes in to a close-up. Audio: crowd noise and the Joker laughing.
Watch with sound: base H3, then fine-tuned
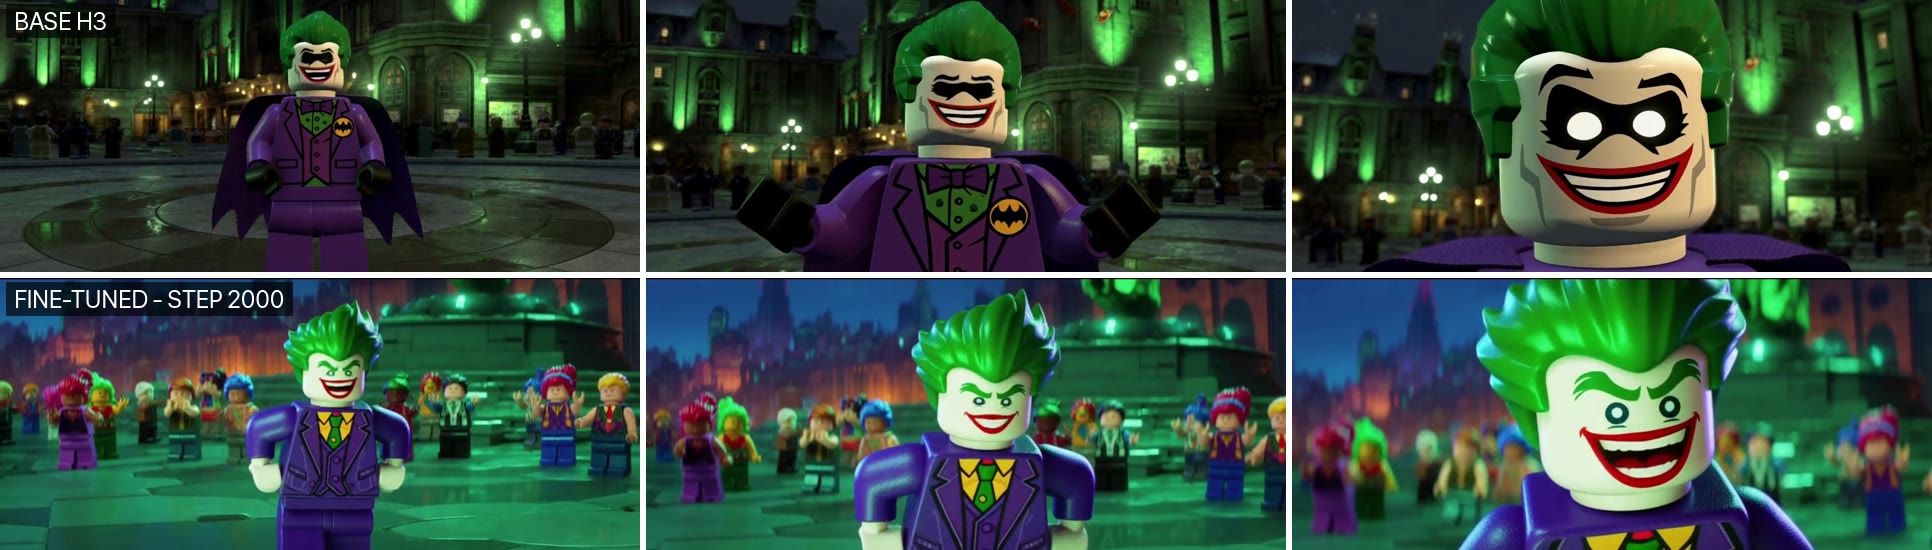
Base H3 knows who the Joker is. It even gives him Batman's logo on his waistcoat. But it doesn't know this film's Joker:
| Base H3 | Fine-tuned (step 2,000) | |
|---|---|---|
| The Joker | A generic LEGO Joker, with Batman's logo on his waistcoat | The film's Joker: tall swept-back hair, green tie, yellow shirt |
| The square | A few figures far in the distance | Packed with LEGO minifigures |
| Light | Flat green floodlights | Green light against a warm evening sky |
| Face | A printed face that barely moves | Raised brows, a wide open laugh |
The prompt asks for crowd noise. Only the fine-tuned version puts a crowd on screen.
Example 2: Batman, after only 250 steps
lego batman style, Batman in a black suit with a yellow bat emblem stands on a Gotham rooftop at night and turns to the camera. He says, "I work alone." Blue night lighting with orange windows. Slow push in. Audio: city wind, distant sirens, Batman's deep voice.
Watch with sound: base H3, then fine-tuned
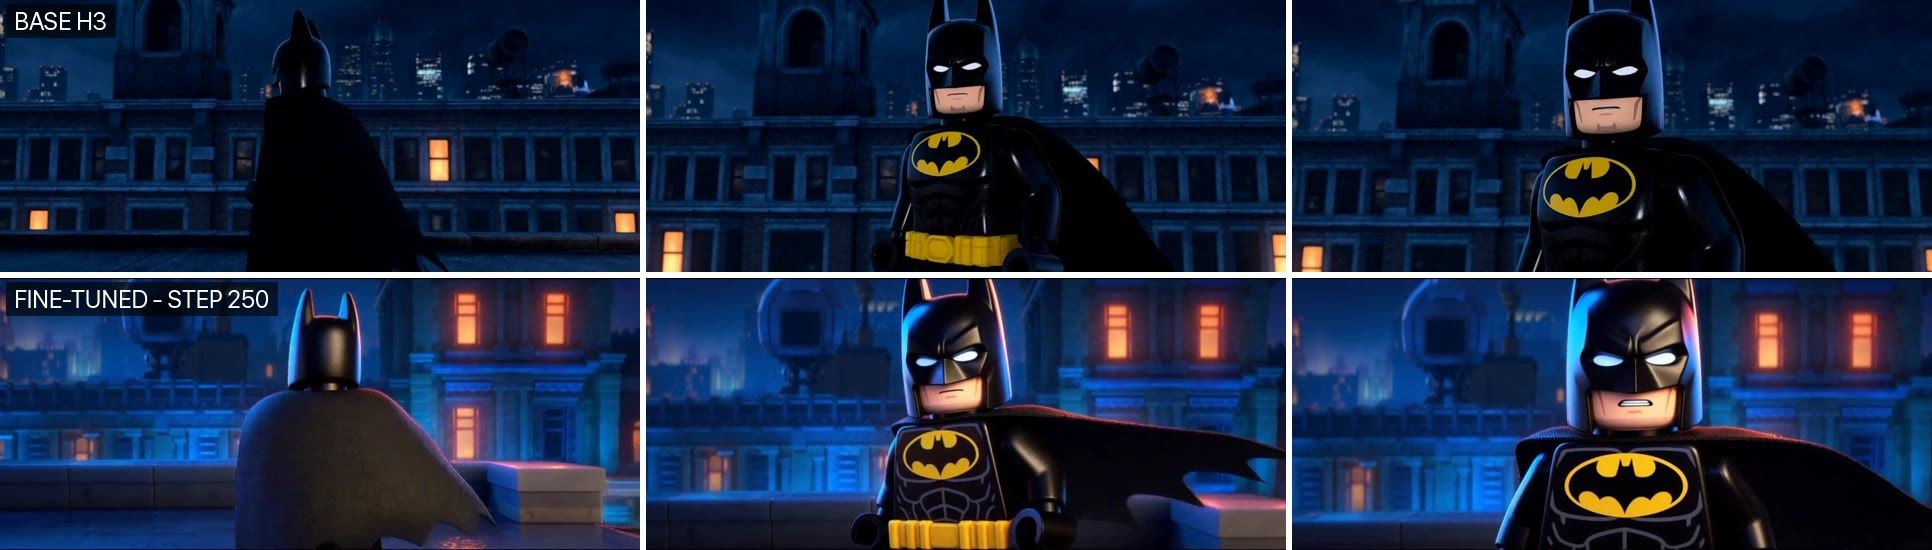
| Base H3 | Fine-tuned (step 250) | |
|---|---|---|
| Batman | A smooth, matte toy | Glossy plastic, a sculpted suit, rim light |
| Face | Blank | A scowl with gritted teeth |
| Light | Dark blue, a few small windows | Glowing orange windows against deep blue |
| Set | A plain building front | A rooftop with ledges and props |
This is after just 250 steps: one-eighth of the run, about 80 minutes of training. The film's look starts to show up early.
What didn't change: with no trigger phrase, our control prompt (a man walking down a rainy street) stayed live-action at steps 1,000 and 2,000. The new look only appears when you ask for it.
(One prompt and one seed per example. These are observations, not a scored result.)
Why not just write a better prompt?
A look is many small things at once: lighting, colour grade, how the plastic shines, how the camera moves, how characters sound. A prompt can name a few of them. It can't hold all of them, every time, for every scene.
Sound is even harder to describe. "Deep gravelly voice" leaves a lot of room. Examples don't.
If the look isn't in the model, no prompt can find it. That's the real reason teams fine-tune: their own characters, their own art style, their own brand. This film was our test case for that process, because it has a strong, recognisable look and sound.
So the question we set out to answer: can you teach a 33-billion-parameter video-and-audio model a new look, on one rented GPU?
What we built
The fine-tune is a LoRA: about 10 million trainable parameters that plug into H3's 33 billion. It's the standard way to fine-tune a model this size: H3 stays frozen, and the LoRA learns the look from examples. You turn it on with a trigger phrase in the prompt: lego batman style.
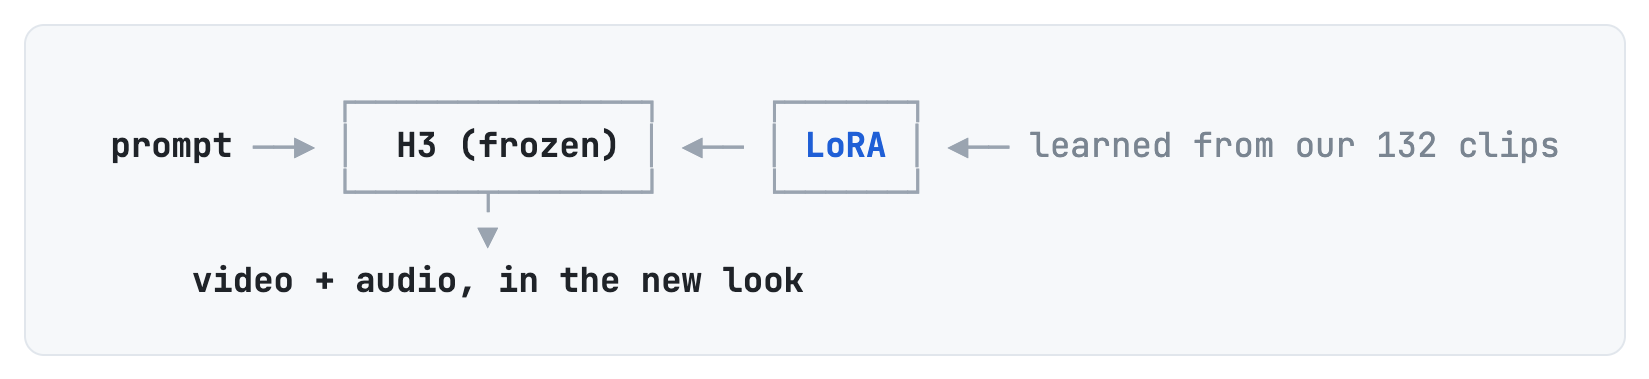
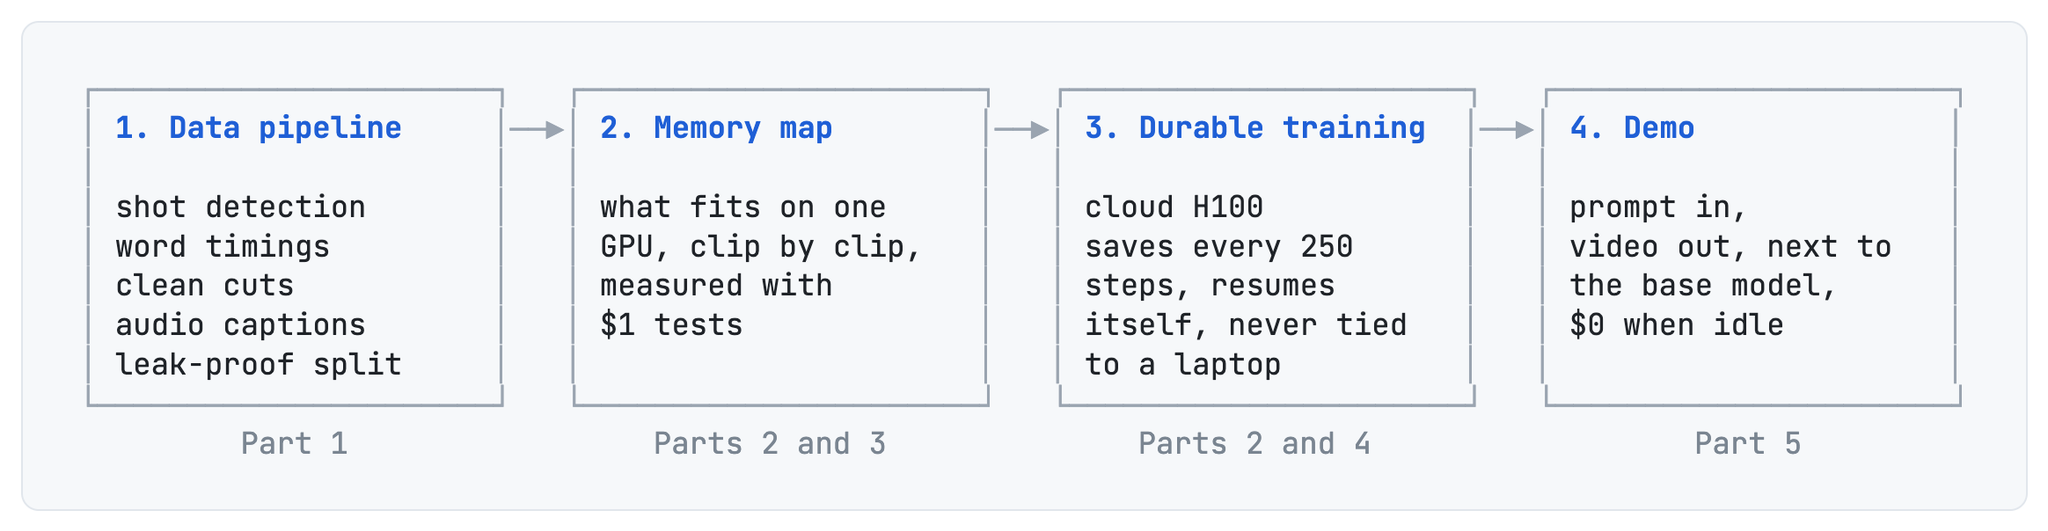
The LoRA file itself is the easy part. The training step is a config file. Getting a good result from a video-and-audio model needed a whole system around it, and that's what most of this post is about:
What it looks like
The examples above are characters from the film. Here are three harder tests: a subject the film never had, and two film characters in brand-new scenes.
Something the film never had: an astronaut
lego batman style, An astronaut in a white spacesuit plants a flag on the grey surface of the moon and gives a thumbs up. Hard white sunlight against a black sky with Earth on the horizon. The camera slowly arcs around the astronaut. Audio: the astronaut's breathing in the helmet and radio static.
Watch with sound: base H3, then fine-tuned
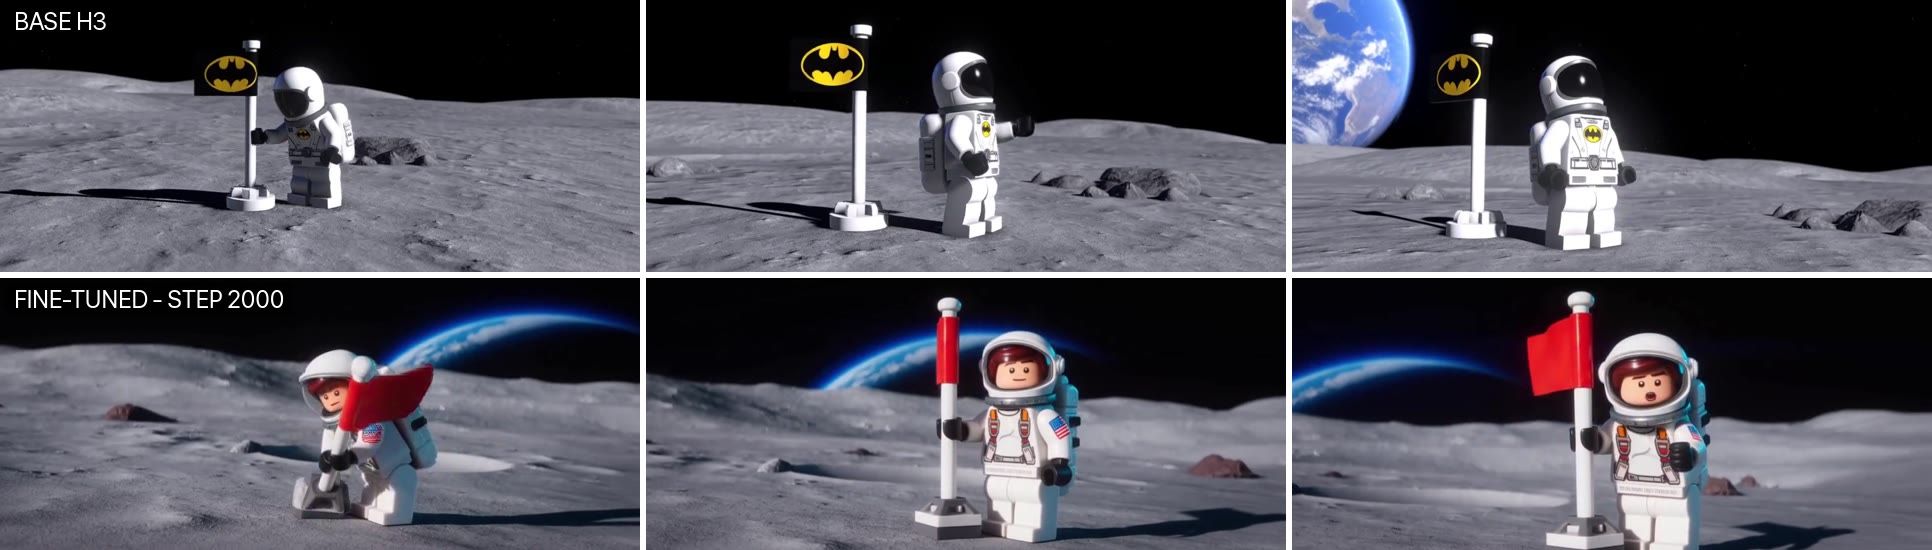
This one surprised us. Base H3 read lego batman style as what to show: it put Batman's logo on the flag and on the suit. The fine-tuned model read it as how to show it: a LEGO astronaut with a face, a plain red flag, a glowing blue Earth, and no Batman anywhere.
That's the difference between a model that knows the words and a model that has learned a look.
A new scene for the Joker, with dialogue
lego batman style, The Joker with green hair and a purple suit leans over a table covered in maps and blueprints, grinning, then slams his hand down. Green and purple light from a single hanging lamp. The camera starts in a close-up on his face and pulls back to a medium shot. Audio: the Joker laughs and says, "Tonight, Gotham finally gets the punchline."
Watch with sound: base H3, then fine-tuned
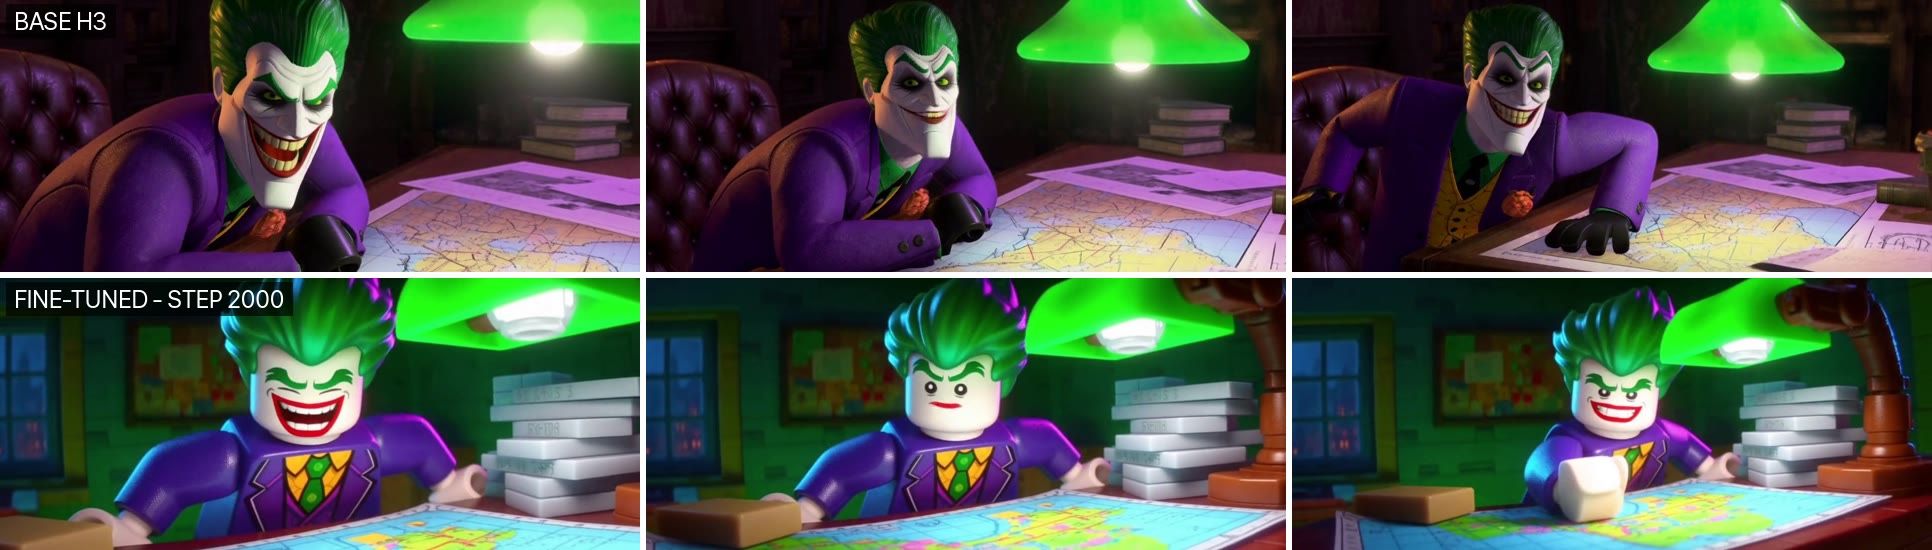
Base H3 dropped the LEGO entirely and made a cartoon Joker in a leather chair. The fine-tuned model kept him a minifigure in the film's design, with LEGO bricks stacked on the desk. Both say the line clearly: "Tonight, Gotham finally gets the punchline!"
Batman's dinner for one: listen to this one
lego batman style, Batman in a black suit with a yellow bat emblem sits alone at a huge dinner table in Wayne Manor and eats a microwave meal, then looks at the camera. Dim cold light with one warm candle. The camera holds a wide shot, then cuts to a close-up. Audio: Batman says in a deep gravelly voice, "Dinner for one. Again. Nailed it," then a microwave beeps.
Watch with sound: base H3, then fine-tuned
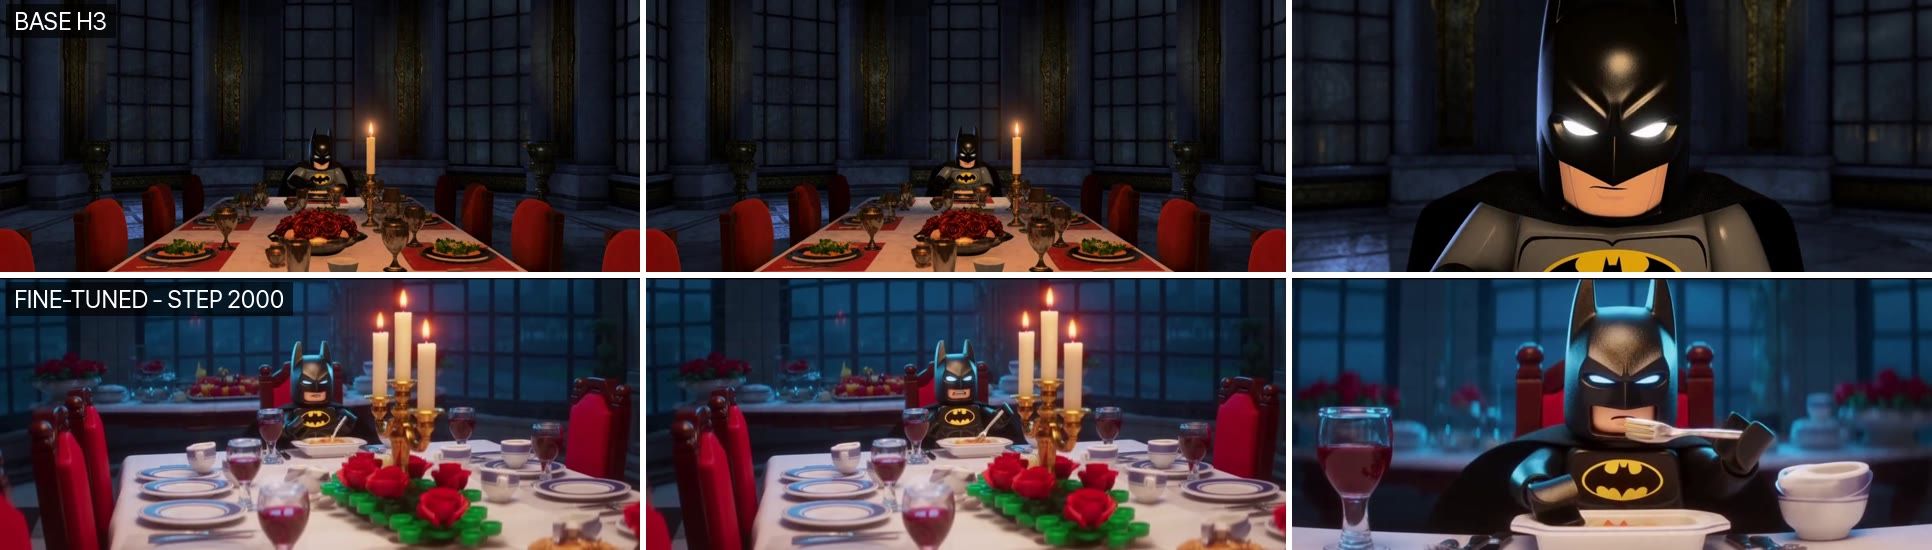
Both versions say the line word for word: "Dinner for one. Again. Nailed it." So this is the clip to listen to.
In the picture, base H3 made a dim, empty hall, and in the close-up Batman's suit turns grey. The fine-tuned model built the scene out of LEGO, down to the brick roses on the table. It kept the suit black and shows him actually eating his meal. One thing base did better: the prompt asks for one candle, and base gave one. The fine-tuned model lit a whole candelabra.
Want to try your own prompt? See Try it yourself.
The setup
| Part | What we used |
|---|---|
| Model | H3 Ref2VA, a "pruned" checkpoint (smaller, with the same quality claims) |
| Precision | 8-bit model weights, 4-bit text encoder, so it fits on one GPU |
| Trainer | Ostris AI Toolkit |
| GPU | One NVIDIA H100 (80 GB) on Modal, billed per second |
| Recipe | LoRA rank 16, learning rate 1e-4, batch size 1, 2,000 steps |
| Storage | A Modal volume. The 43 GB of models download once and are reused by every run. |
The recipe follows fal's published H3 LoRA guide. We didn't tune it, because the first goal was to get one run working end to end.
Part 1: The data is the hard part
With images, you collect pictures and write captions. With video and audio, every clip needs decisions about where it starts, where it ends, and what it sounds like. Most of our time went here.
Here's the pipeline:
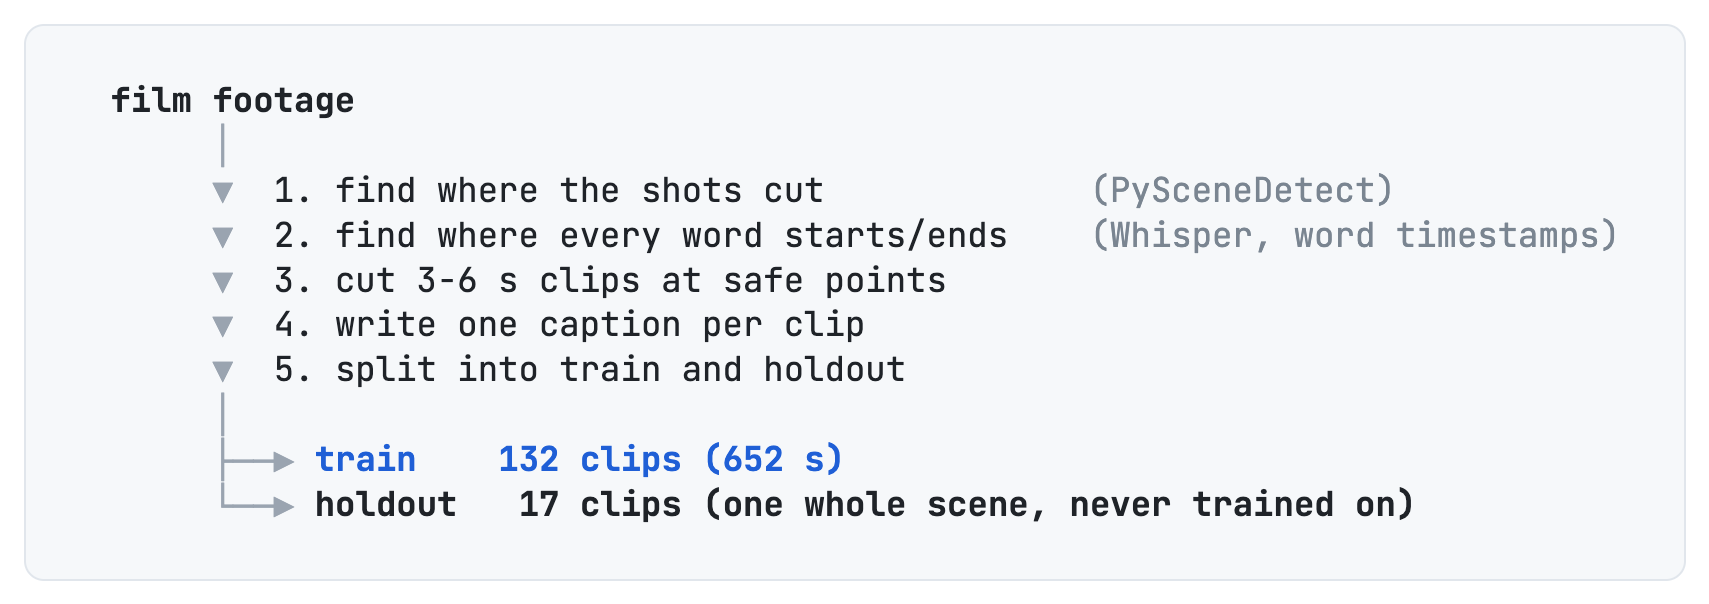
These are the five rules we learned.
Rule 1: Use only the clip lengths the model accepts
H3 only accepts frame counts of the form 17n + 5: 73, 90, 107, 124, 141, and so on. At 24 frames per second, that's about 3.0, 3.75, 4.5, 5.2 and 5.9 seconds.
A 100-frame clip isn't "close enough". The trainer will cut or pad it. So we cut every clip to an exact legal length from the start, and we knew exactly what the model would see.
Rule 2: Never cut a word in half
H3 learns the picture and the sound. If your clips cut words off mid-syllable, you're teaching the model that speech sounds chopped.
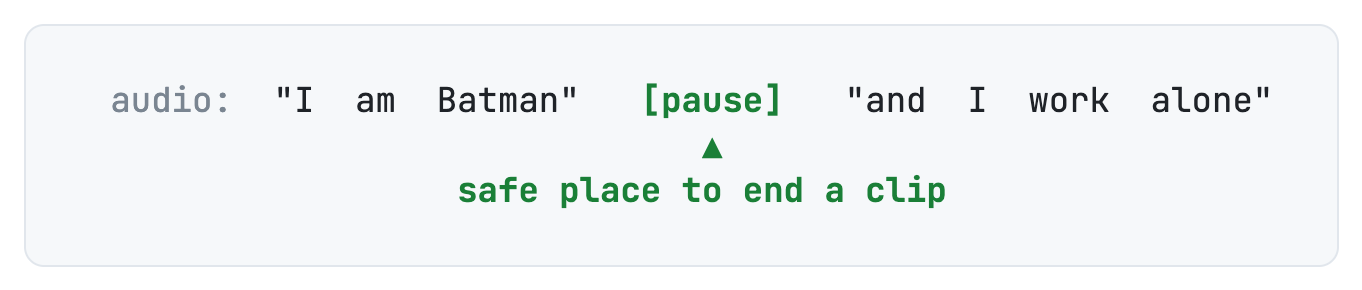
So we ran Whisper with word-level timestamps, and the cutter only ends a clip:
- at a shot cut, or
- in a pause between two words.
Rule 3: Stay away from the edges of shots
If a clip starts half a second before a cut, it begins with a few stray frames from a different shot. The model learns that too.
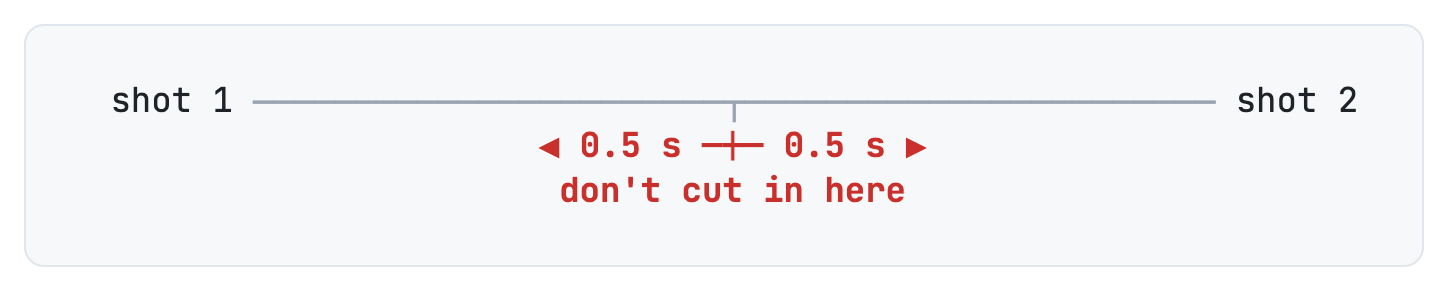
Our rule: any cut we make inside a shot stays at least 0.5 seconds from a real shot cut.
Rule 4: Caption the sound, not just the picture
To write the captions, we used MiniMax's own H3 prompt-writing guide as the reference. It shows how H3 expects a scene to be described: the action, the light, the camera, the dialogue, and the sound. That way the captions match how people will prompt the model later.
Every caption is one paragraph. It describes what we see first and what we hear last. Every caption starts with the trigger phrase:
lego batman style, Batman stands in the Batcave in front of a wall of glowing screens… The camera slowly pushes in… We hear the hum of the computers and Batman says, "…"
Our captions ran 34 to 82 words.
One rule that's easy to break: put the trigger in the captions or in the trainer's trigger_word setting, never both. We put it in the captions and left the setting empty.
Rule 5: Hold out a whole scene, not random clips
Neighbouring clips from the same scene look almost the same. If you hold out random clips, near-duplicates of your test clips end up in training, and your test tells you nothing.
We held out one whole scene: the rooftop sequence, 17 clips. A script also checks that no training caption repeats a held-out one.
Result: 149 clips. 132 for training and 17 held out. All are 1280×544 at 24 fps, with sound.
Part 2: The bottlenecks
This is where you'll save the most time. Every one of these cost us a run, money, or hours.
Bottleneck 1: The trainer's default would have sped up our videos 5×
AI Toolkit has a setting called shrink_video_to_frames, and it's on by default. It squeezes every clip down to the frame count you ask for. Our first version of the data had clips up to 14 seconds long. Squeezed into 73 frames, they would have played about 5× too fast, with the audio sped up to match.

The model would have learned that the style means frantic motion and chipmunk voices.
Learning: read every default in your trainer's dataset section, especially for video. Defaults made for images can quietly wreck video.
Bottleneck 2: Long clips don't fit in memory, and the growth is steep
This is the one people underestimate.
A video model doesn't see frames, it sees tokens. H3 compresses the video, and at 1280×544 each compressed frame becomes about 680 tokens. Longer clips mean many more tokens:
| Clip | Frames | Tokens (approx.) |
|---|---|---|
| 3 s | 73 | ~15,000 |
| 6 s | 141 | ~29,000 |
| 14 s | 345 | ~69,000 |
Attention cost grows faster than the token count, so memory and time climb steeply. Here's what we measured on one H100 (80 GB):
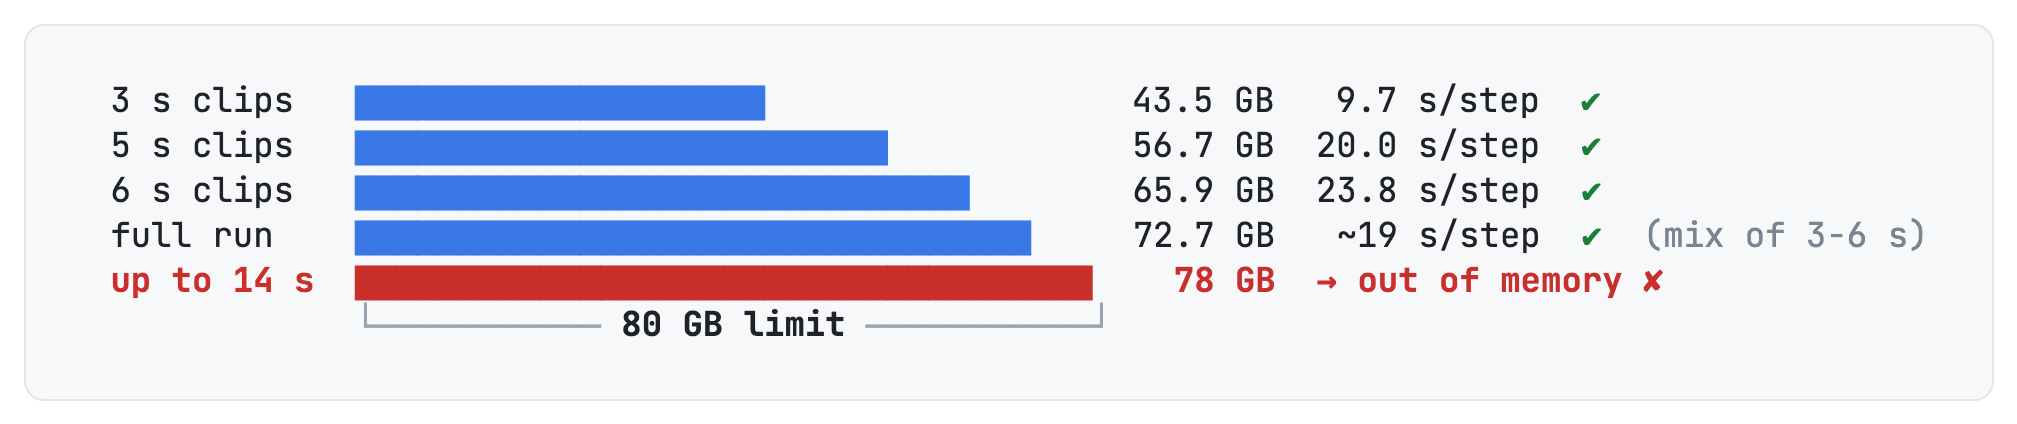
Our first dataset had clips up to 14 seconds. It ran out of memory on the first training step.
We had two choices:
- Cut 3-second windows from the long clips. That fits, but each clip is only a slice of its scene, and the caption describes the whole clip, not the slice.
- Re-cut the source footage into short clips (3–6 s) and write a caption for each one. That's more work, but the caption matches exactly what the model sees.
We re-cut. Then we trained each clip at its own length (auto_frame_count: true), so nothing was stretched, squeezed, or wasted.
Learning: for video, clip length is your main memory dial. Measure it before you build the whole dataset around one length. On one H100, about 6 seconds at 1280×544 was our ceiling, with roughly 7 GB to spare.
Bottleneck 3: Your laptop can kill a 12-hour run
Our full run died at step 1,042 of 2,000, about 6 hours in. The cause: we launched it with Modal's .remote(), which ties the job to the process on your laptop, even with --detach. That process died, and the job died with it.

The fix: launch long jobs with .spawn(), which hands the job to Modal and returns straight away. Checkpoints every 250 steps saved us: AI Toolkit resumed from step 1,000, so we lost only 42 steps.
Learning: long jobs should never depend on your laptop staying awake, and checkpoints are cheap insurance.
Part 3: The smoke-test ladder
The way to find problems like these before they get expensive is a ladder of cheap tests. Each test answers one question and costs about $1. We only climbed to the next rung when the previous one passed.
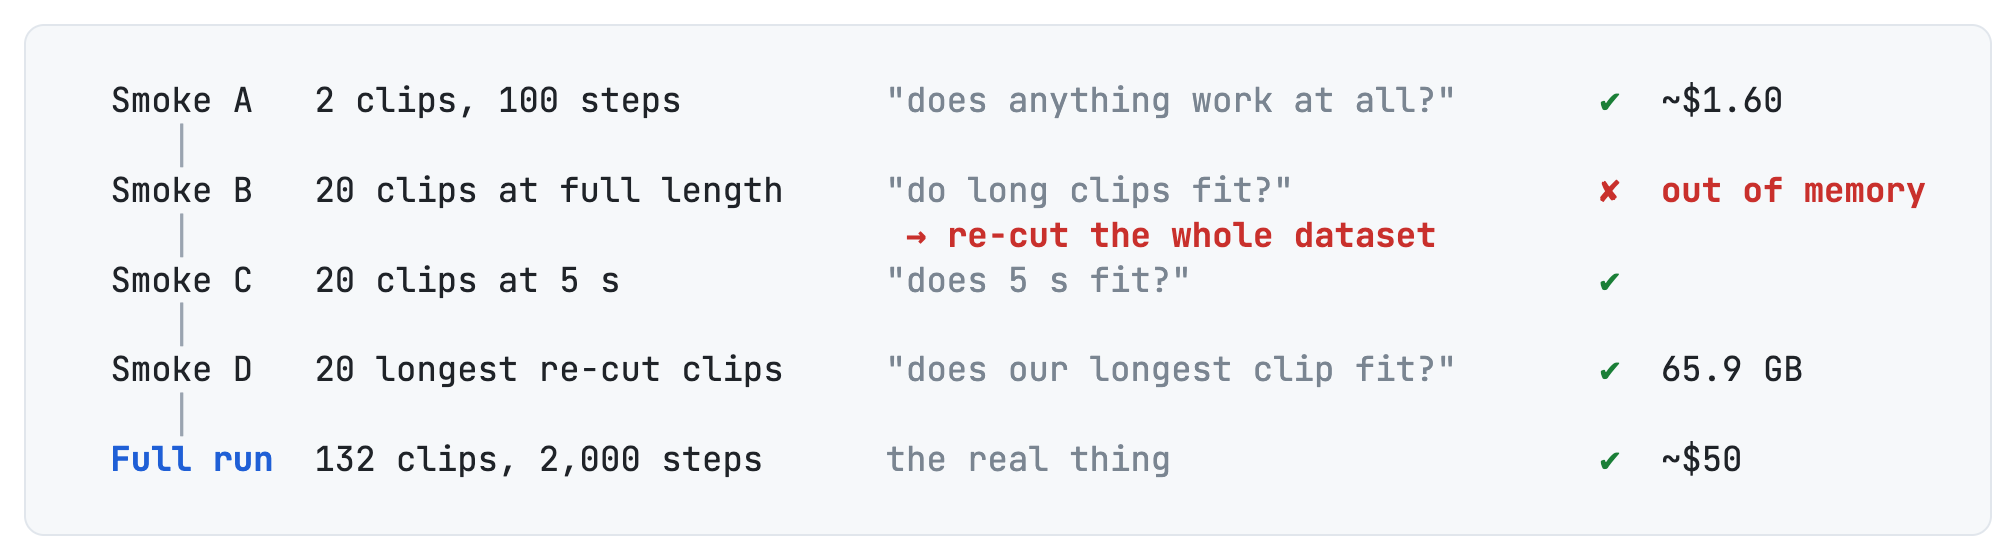
All the smoke tests together cost $5.18. Smoke B "failed", and it was the most useful test of the lot: it changed the dataset before we spent $50 on the wrong one.
Smoke A even caught a crash at the very end: with no negative prompt set, AI Toolkit passes False to the text encoder while generating the sample video. One line fixed it: neg: "". Better to find that for $0.60 than at the end of a 12-hour run.
Learning: a smoke test that fails is a success. Design each one to answer exactly one question.
Part 4: What it cost
From the Modal bill, listed per run:
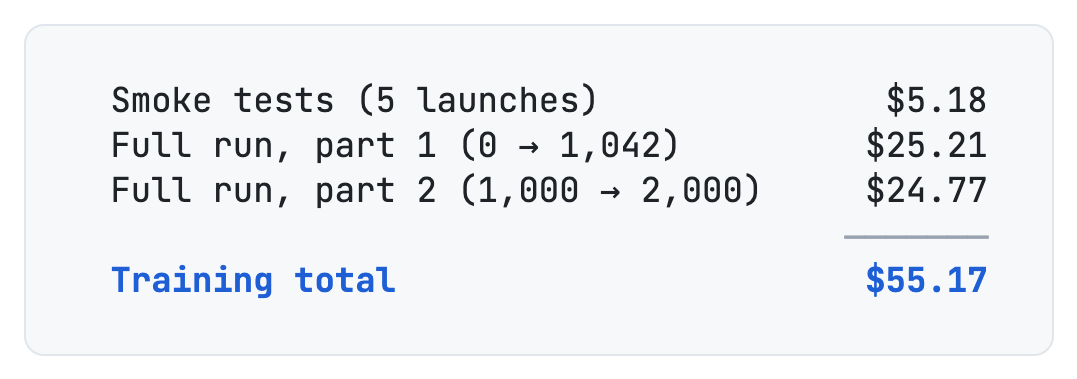
Without the restart, the full run would have cost about $48–49.
Training ran at about 19 seconds per step, so 2,000 steps took about 11 hours of GPU time.
Not included: storage for the volume. Modal bills it per workspace, not per run, and part of it falls inside the free allowance.
Part 5: Try it yourself
We built a small page where you type a prompt, pick a checkpoint, and get a video back. It can also generate the base model's version of the same prompt next to it, so you can see what fine-tuning changed. For prompt ideas, borrow from the examples in fal's H3 prompting guide and add lego batman style at the start.
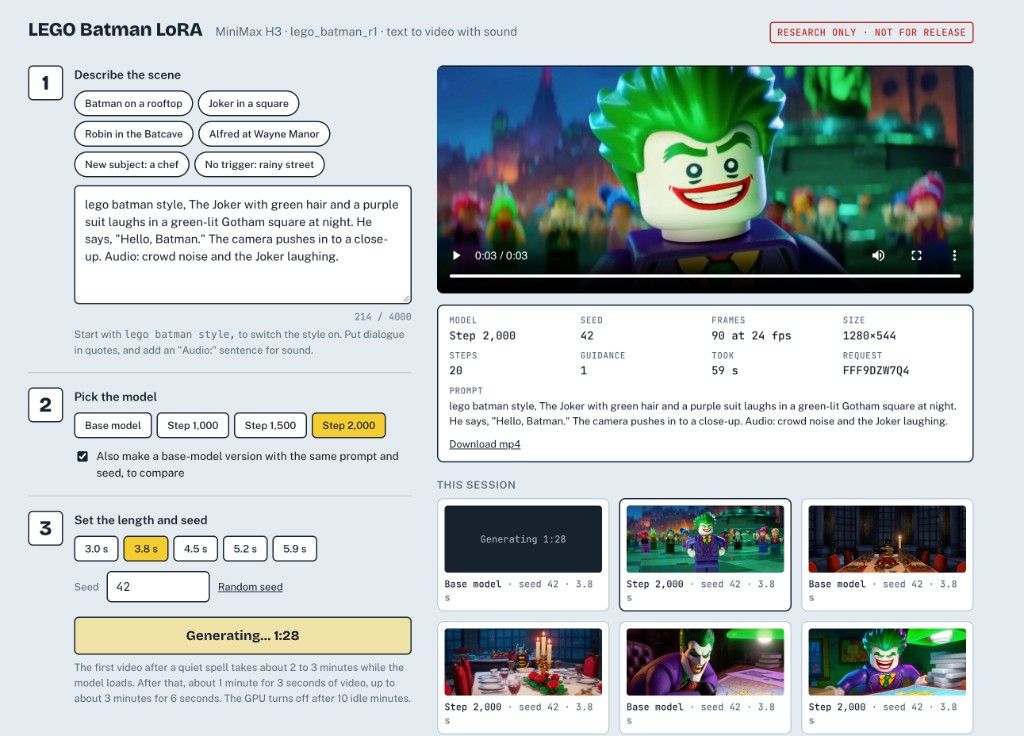
If you want to try it, DM for the password.
The demo is password protected, because every video costs us real GPU money. If you're seriously interested, send a DM and we'll share the password.
What to expect:
- The first video takes about 2–3 minutes while the model loads onto the GPU. After that, a 3-second video takes about 50 seconds.
- Each video costs us about $0.30, mostly for loading the model and keeping the GPU warm. Generating one costs only a few cents. While nobody uses it, it costs nothing.
A sanity check worth copying: generate one video with the same prompt and seed as a training sample. Ours matched the training sample exactly, which proved the page loads the fine-tuned weights correctly.
See the examples in What it looks like.
The short version
- Base H3 knew the character, not the film's look. Fine-tuning taught it the look from 132 clips, and prompts without the trigger stayed unchanged.
- Video fine-tuning is mostly a data problem. Use legal clip lengths, never cut mid-word, keep away from shot edges, caption the sound, and hold out whole scenes.
- Clip length is your memory dial. On one H100 at 1280×544, about 6 seconds was the ceiling.
- Check your trainer's video defaults. One default would have sped our clips up 5×.
- Climb a ladder of $1 smoke tests before the $50 run, and make long jobs survive your laptop closing.
All of this ran on one rented H100 for about $55 of training. Want to try it? DM me for the demo password.